
ストレージ
There are multiple ways of storing notes in Butterfly. Either by using your device storage, or by using the cloud storage (WebDAV).
Data directory
Section titled “Data directory”The data directory is the directory where documents, templates, and packs are stored.
On desktop you can find it in ~/Documents/Linwood/Butterfly.
モバイルでは、 getExternalFilesDir(null)/Linwood/Butterfly にあります。
You can also change it under Settings → Data.
このディレクトリには、Documents、Templates、Packsフォルダがあります。
Changing Settings → Data → Data directory moves the existing application data to the new directory. To browse additional folders while keeping this directory, add local connections instead.
Local connections
Section titled “Local connections”On native platforms, open Settings → Connections → Add connection → Local. Choose a name and a base directory, then select Create. Add a connection for each storage location you want to browse. Use Sources in the file view to switch between the default storage and your connections. You can also choose a default connection in Settings.
By default, a connection with base directory /mnt/data/notes stores notes in
/mnt/data/notes/Documents, templates in /mnt/data/notes/Templates, and packs
in /mnt/data/notes/Packs. Open Advanced to change these directories:
| ドキュメントディレクトリ | Where notes are stored |
|---|---|
| Empty | Documents disabled for this connection |
Documents (default) |
/mnt/data/notes/Documents |
myfolder |
/mnt/data/notes/myfolder |
. |
/mnt/data/notes directly |
/mnt/other/notes (absolute path) |
/mnt/other/notes |
The same rules apply to the Templates and Packs directory fields. An empty field
disables that directory type for this connection, without creating a replacement
folder. Use . to store files directly in the base folder.
If you leave the base directory empty, every enabled directory must be an absolute path.
Choosing a directory adds access to that folder; it does not import or move its
existing files. Existing connections keep their configured directory layout.
Paths inside the file view are relative to the selected source’s Documents
directory. For example, /myfolder/note.bfly inside a connection whose Documents
directory is /mnt/data/notes means /mnt/data/notes/myfolder/note.bfly on disk.
Do not enter the full device path in the file view or a template’s note directory.
Enter device paths in the connection’s directory settings instead.
Opening and removing connections
Section titled “Opening and removing connections”A note opened from a connection displays @connection_name after its path to
identify the source. A .bfly or .tbfly note opened from your device’s file
manager uses its device path and saves back to that file. It does not need a
connection name. Importing other formats creates a new Butterfly note when saved.
Removing a connection only removes its configuration from Butterfly. It does not delete or move notes, templates, or packs in the connected directories. Add the connection again to browse them. An open document whose connection was removed cannot save to that connection; reconnect it or export the note to another folder.
アプリケーションデータはブラウザに保存されます。ローカルストレージに保存されます。ブラウザで開発者ツールを開くと、データが表示されます。
ネイティブプラットフォーム
Section titled “ネイティブプラットフォーム”By default, the application saves the data in your documents folder in a subfolder called “Linwood/Butterfly”. This folder is created when you save data for the first time. このフォルダは設定で変更できます。
リモートストレージ
Section titled “リモートストレージ”The application data can be stored on a remote server. これは、データを他の人と共有したい場合や、複数のコンピュータをお持ちの場合に便利です。現在 WebDAV プロトコルのみがサポートされています。
To add a remote server, open Settings → Connections and add a connection. リモートサーバーの URL とユーザー名とパスワードを追加します。その後、データが格納されているフォルダを指定できます。
To get the WebDAV URL, please visit the documentation:
Nextcloud (it should look like this: https://nextcloud.example.com/remote.php/dav/files/username/, replace username and nextcloud.example.com with the correct values)
Instructions for NextCloud
Section titled “Instructions for NextCloud”How to get the URL
Section titled “How to get the URL”- Go to
Files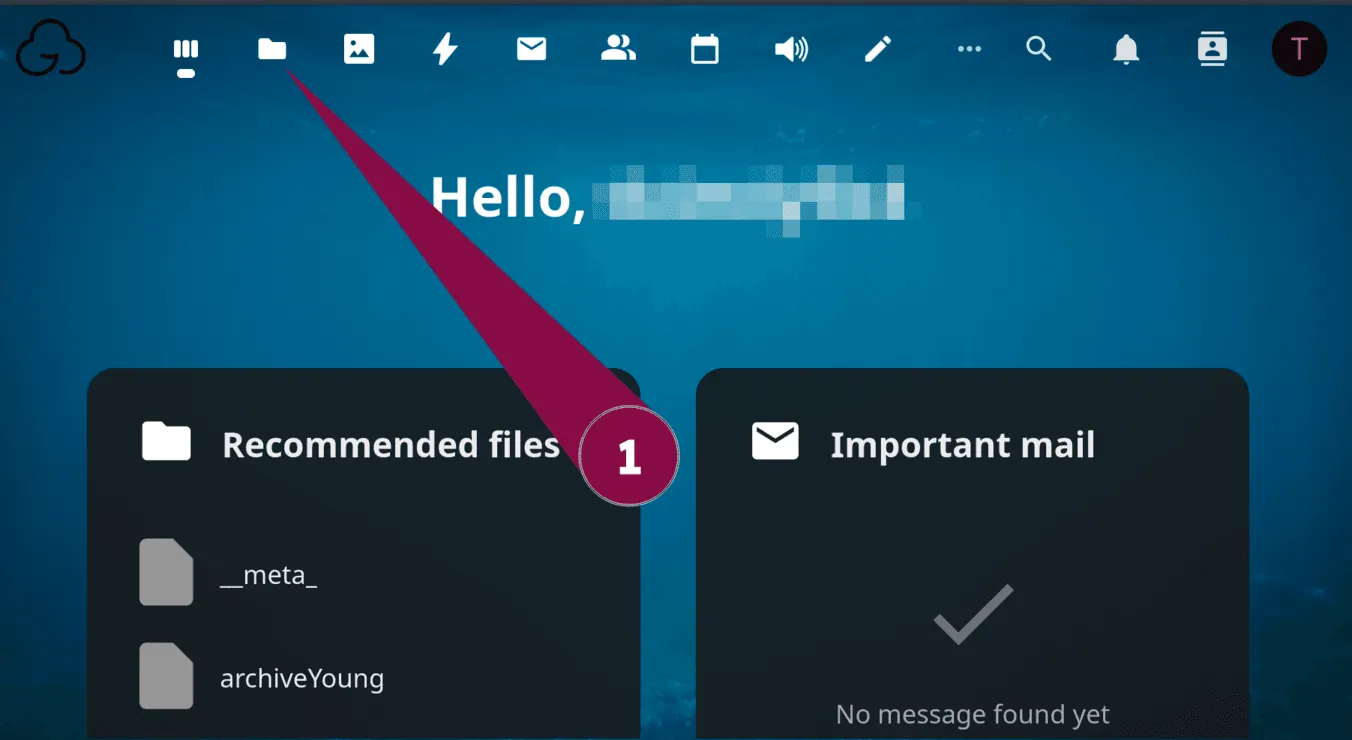
- Press the button on the bottom of the sidebar
Files settings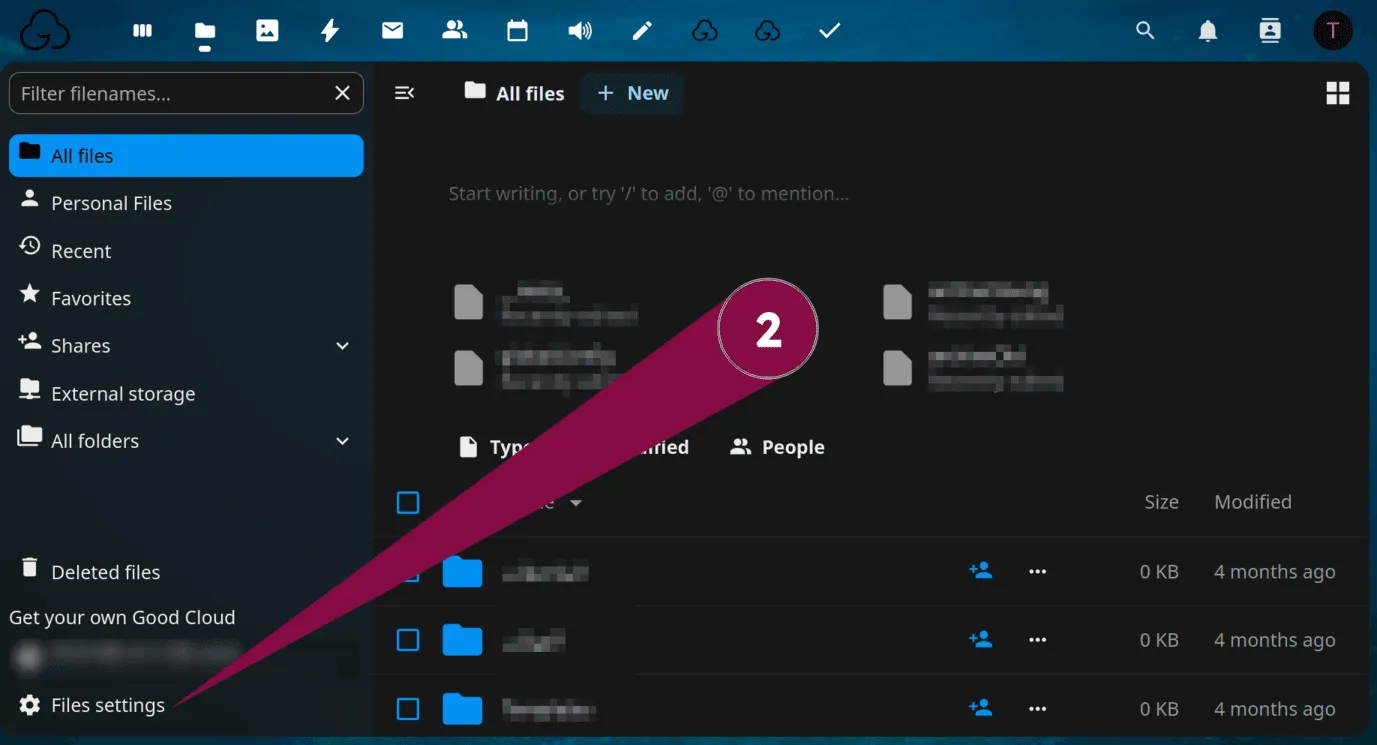
- Scroll down to the
WebDAVsection, then copy the full URL shown inside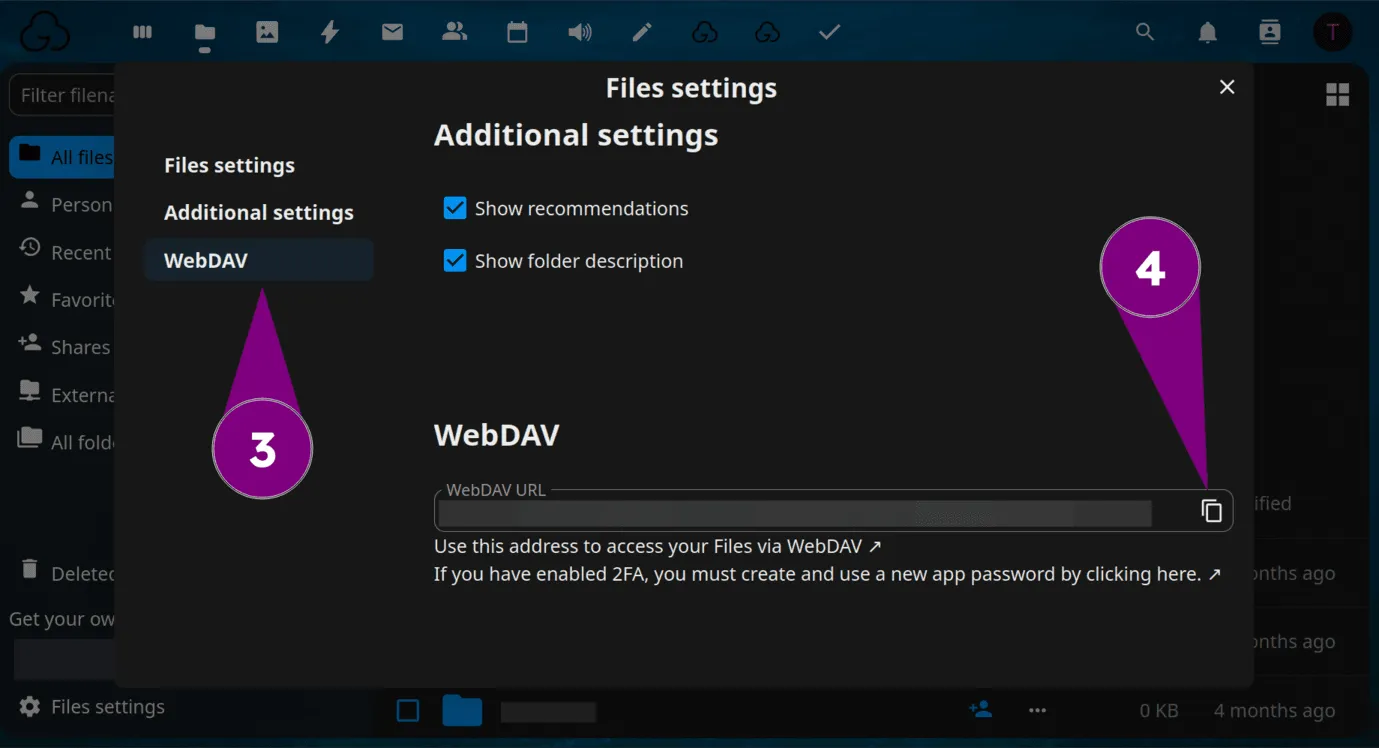
- Switch to Butterfly, and paste the URL in the URL input box in Butterfly
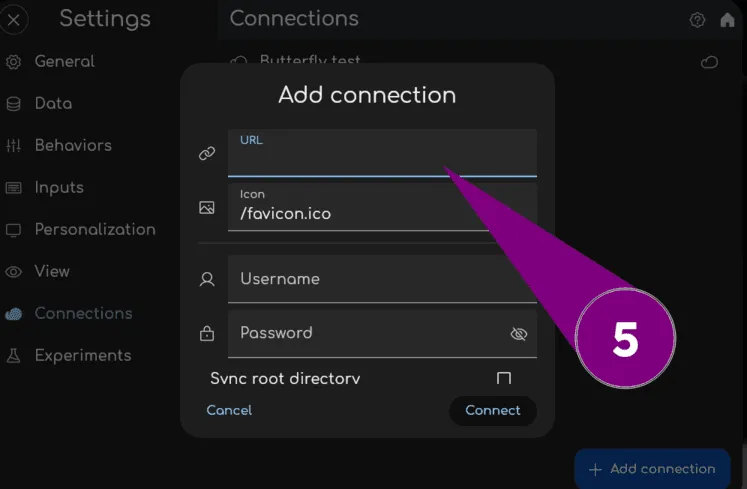
How to get the password and username
Section titled “How to get the password and username”- Go to your Nextcloud account info by pressing the profile picture on the corner
- Then, press
Settings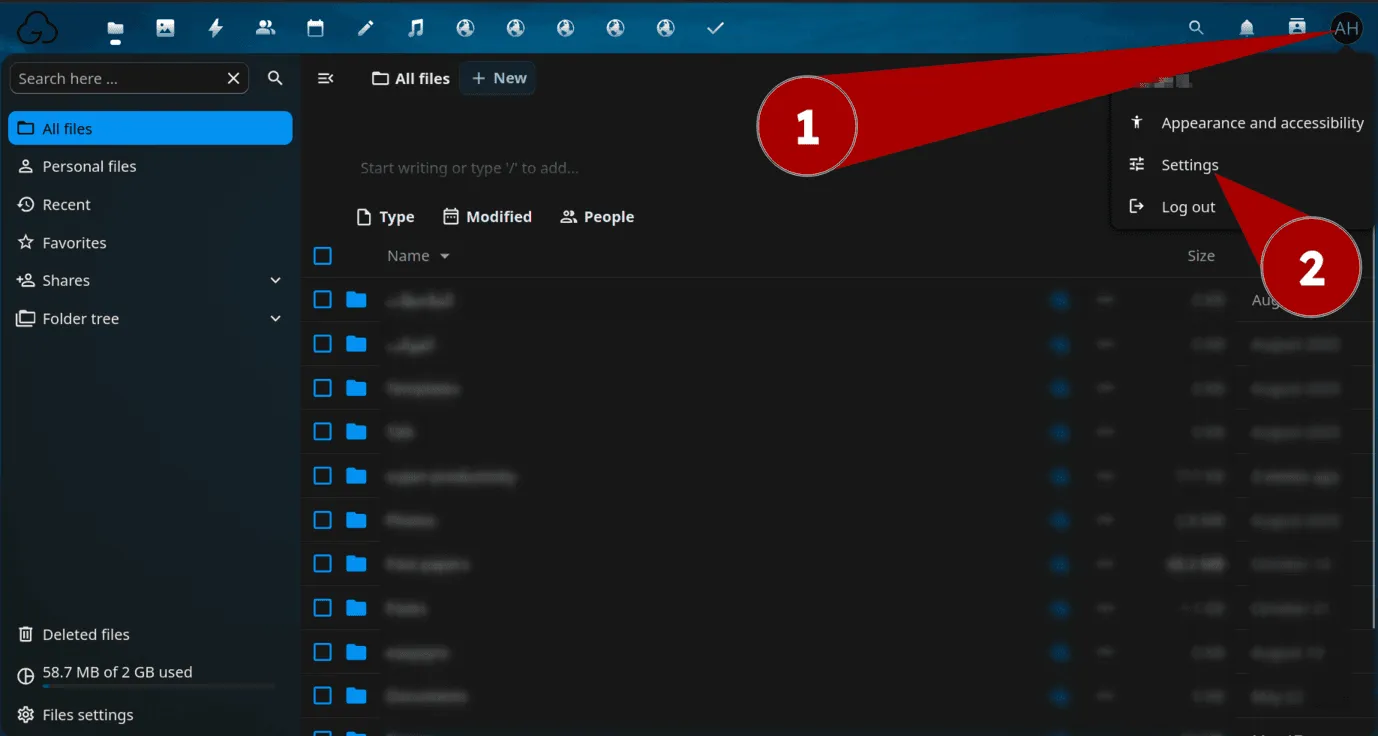
- In the Security tab, scroll down to
Devices & sessions - Enter any name for the app name input box
- “Butterfly Connection” is a good name to use, as it is identifiable and clear.
- Press the button called
Create new app password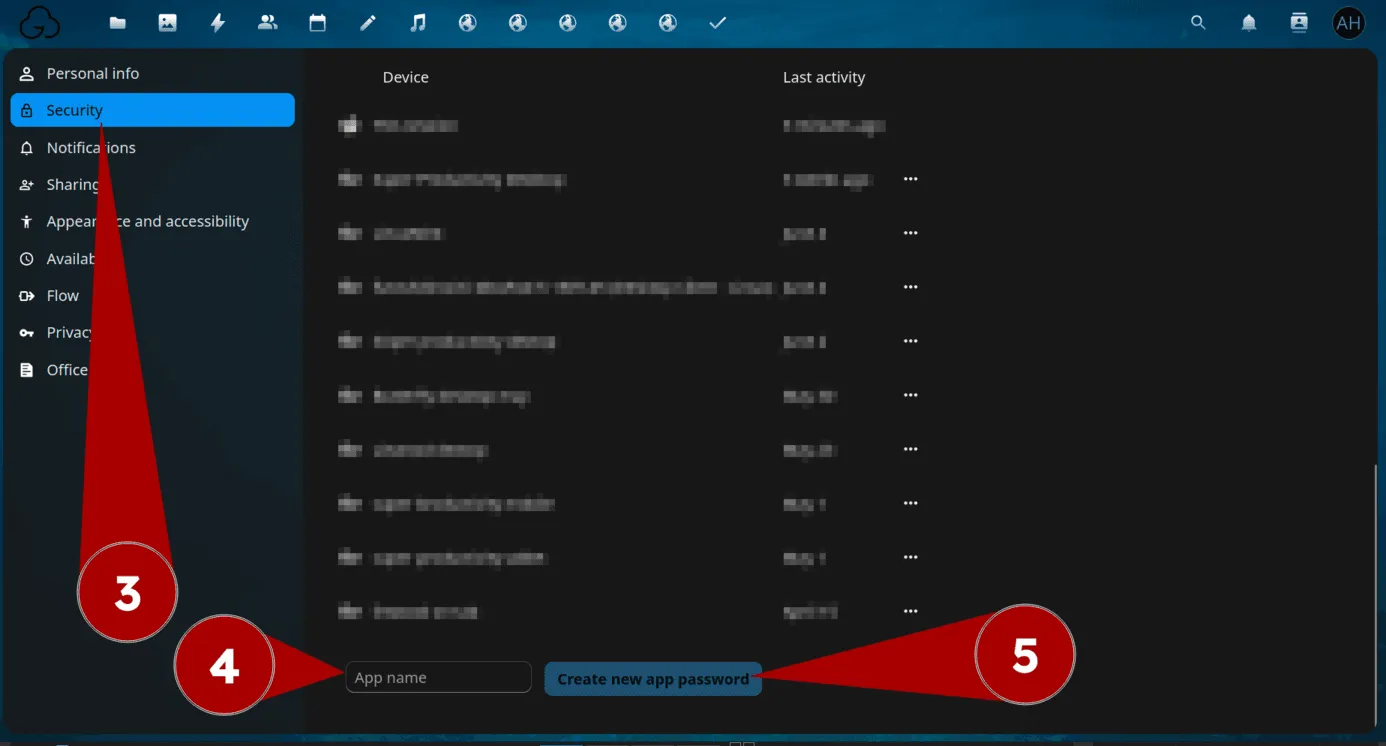
- After authenticating, copy the app password username shown on the page, and paste it in the username input box in Butterfly
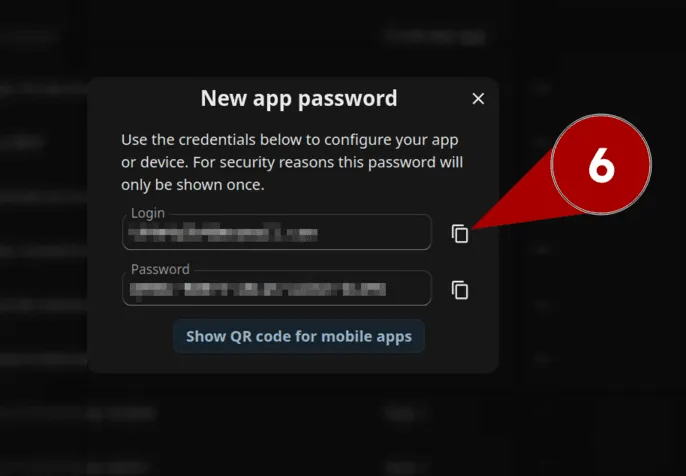
- Finally, copy the password and paste it in the password input box in Butterfly
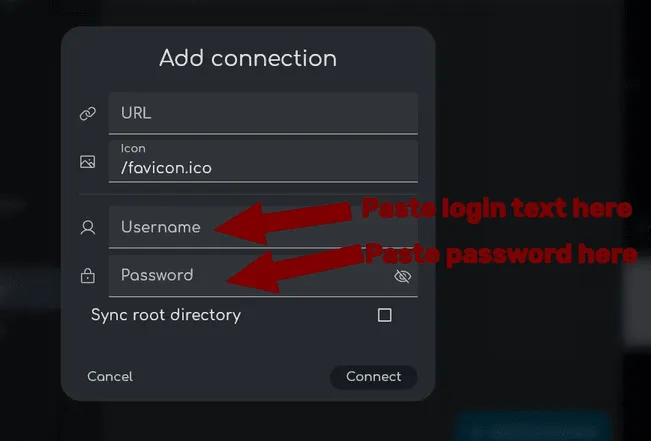
Finalizing the connection setup
Section titled “Finalizing the connection setup”After doing the above, press the Connect button.
If you have done everything correctly, there will be some new stuff down the popup.
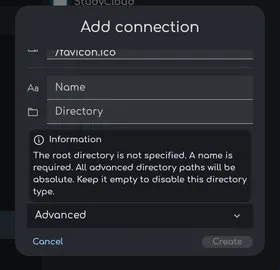
Type the name of this connection in the Name inputbox, you can name it anything.
Then, for the Directory inputbox, you need to type where should Butterfly store stuff inside this cloud storage.
For example:
if you type ButterflyDocs for Directory, Butterfly will store all your files inside the ButterflyDocs folder in your cloud storage.
Lastly, after typing the name of the folder you want Butterfly to store your notes in, press Create.
That’s it. Syncing to the cloud should work now. 🎉
オフライン同期
Section titled “オフライン同期”この機能を使用すると、オフライン中にリモートサーバー上のファイルを編集できます。ファイルまたはフォルダのポップアップメニューを開き、Syncをクリックします。ファイルまたはフォルダをダウンロードし、ローカルに保存します。ルートディレクトリ全体を同期する 作成ダイアログでチェックマークをクリックするか、設定内のリモコンをクリックし、管理セクションのチェックマークをクリックします。
いくつかの制限があります。
- オフライン中はファイルやフォルダを削除できません。
- オフライン中はテンプレートの追加、編集、削除はできません。
その他のストレージ方法
Section titled “その他のストレージ方法”ネイティブデバイスを使用している場合は、お気に入りのプラットフォームとアプリケーションディレクトリを同期することもできます。 Google Drive has an official app on Windows and there are unofficial ones on the Play Store. On Linux you can also use the native remote storage system and change your data directory to this or add a new external storage if you click on the add connection button.
Supported file types
Section titled “Supported file types”Butterfly supports importing SVG, Butterfly Note (.bfly), Butterfly Raw Note (.tbfly).
For the steps to bring files into a document or create output files, see Importing and Exporting.
Butterfly Note (.bfly)
Section titled “Butterfly Note (.bfly)”This file type is the recommended format for saving notes.
It is a zip archive containing the information (mostly in JSON files) about the note. These included JSON files aren’t optimized to be readable by a human in its raw form.
Butterfly Raw Note (.tbfly)
Section titled “Butterfly Raw Note (.tbfly)”This file is recommended for use with version control software like git.
This file is not a zip archive; instead it is a JSON file. It contains all the information about the note in a single JSON file that is optimized for being readable and nicely formatted. It is slower to load than the normal Butterfly Note.
This file type doesn’t save information about the note! When this file is imported into Butterfly, it is treated as a single image.
Use this ONLY when the note shouldn’t be modified by Butterfly.